I’ve got a newsletter now! Subscribe here. I’ll give a free copy of my blending tip pdf.
Watercolor painters learn many different ways to combine and paint color to produce varied effects. While color can be mixed ON THE PALETTE, single colors can also be added to and partially blended ON THE PAPER (as in wet-in-wet, or charging). Adding single colors to paper tends to create lively and vibrant color mixes with lots of variety. (See my recent blog post titled “Charge Ahead and Mingle: Blending Colors on Watercolor Paper,” https://leemuirhaman.com/2019/06/04/charge-ahead-and-mingle-blending-color-on-watercolor-paper/, published June 4, 2019, to learn more about ways to mix color on the paper.)
Glazing is a somewhat more advanced variation of altering color ON THE PAPER. Colors are NOT mixed! A glaze is a transparent wash of color over another (thoroughly dried) layer of color. This stacking or glazing of pigment modifies the underlying color to create a full range of interesting values and colors. (A simple example would be a glaze of pink painted over a layer of yellow to create an orange or peach color.) Glazing can be done on large wash areas or on smaller parts of a painting. Often the light-value colors are applied first, but reversing the order of color application can affect the final appearance in interesting ways. Under most conditions, a painting also progresses from large general areas of light washes to small specific areas of darker washes. When you glaze over only part of your work, try to avoid hard edges left from the glaze by softening or fading out the edges with a clean, damp brush. (See my blog post titled “Softening an Edge or Fading Out”, https://leemuirhaman.com/2018/10/23/softening-an-edge-or-fading-out/, published October 23, 2018, for more information on softening an edge.)
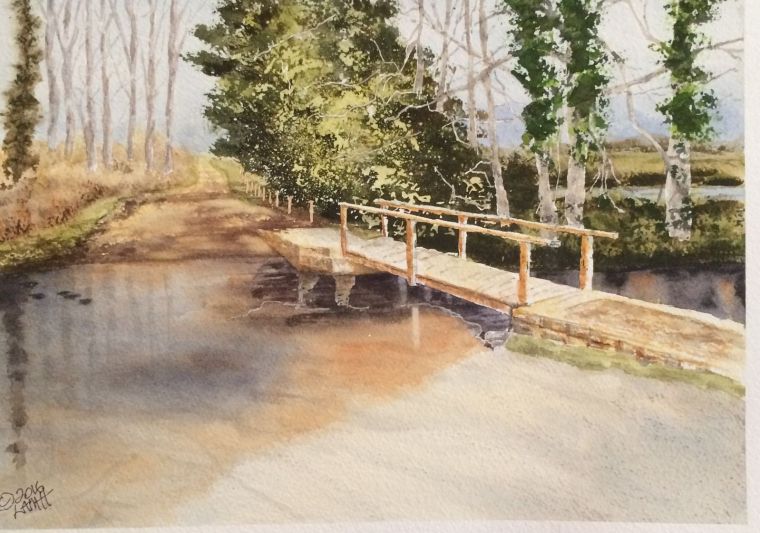
Ford and Footbridge (Glazed water).
Strive to use only fairly pale mixes of color in glazing. If a glaze color is too intense, the underlying layer will have difficulty showing through. By properly applying a glaze, in pale transparent layers, an artist can achieve a “glow” of light as the white of the paper and the colors of lower layers show through later layers of color. Stop adding layers when you have arrived at your desired visual color, because painting too many layers will eventually cut down the amount of light reflecting back from the paper and will deaden any glow. Be careful about using more than three or four glaze layers.
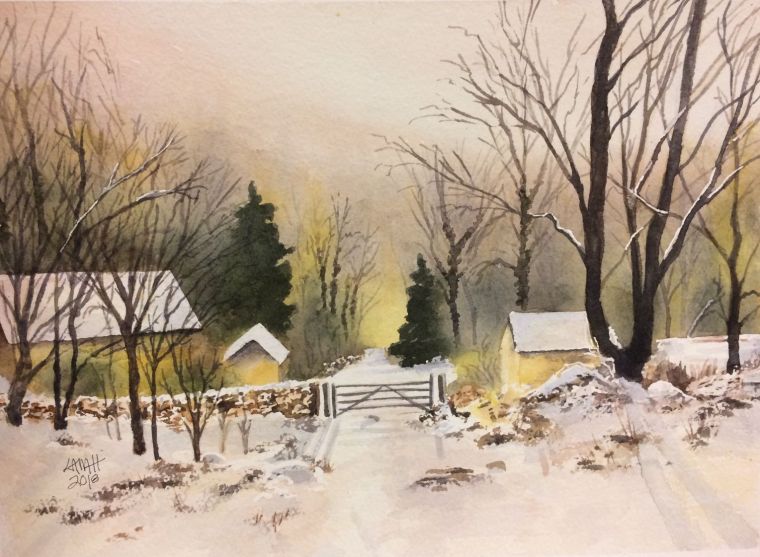
The End of the Day (Glazed sky, buildings, and snow).
What specific pigments work best for glazing? Most often, the best artists use the three primary colors and make sure their pigments are transparent. Specifically, you might use non-staining Aureolin or Hansa Yellow Light, Permanent Rose Quinacridone or Permanent Rose, and Cobalt Blue. If possible, avoid using transparent, staining pigments such as Indian Yellow or Gamboge Hue, Winsor Red or Permanent Alizarin Crimson, and Winsor Blue, which tend to dye the under layers and start to dull or destroy glow or translucence. If you must use staining colors, make sure they are quite diluted (unless, of course, your intention is to revive a dull dark).
Glazes are most effective when the colors used contrast with each other — e.g., warm over cool, blue over orange, etc. The farther away from each other the chosen colors are on the color wheel, the more dramatic their glazing impact on each other. A beautiful, luminous gray can be created by layering yellow, then red, then blue.
A soft brush (often a large flat) will give the best results as it disturbs previous layers of paint less. Layer each wash gently in a smooth, even application over a dried surface, and DO NOT scrub. (If the first layers of color are still wet, the colors can blend and not stay in the separate layers that you are aiming for — you will not be glazing.)
Remember that if the colors you use in glazing are transparent (NOT opaque), the colors beneath will continue to glow through glazes laid on top. Colors will appear to be mixed even though each is in a separate layer. These layers are more luminous than colors mixed on the palette because light passes through each separate layer and takes on each color’s characteristics. (NOT all watercolors are transparent! Cerulean Blue, Indian Red, Cadmium Red, Cadmium Yellow, Cadmium Orange, Payne’s Gray, and Yellow Ochre are some of the opaque watercolors in common use.)
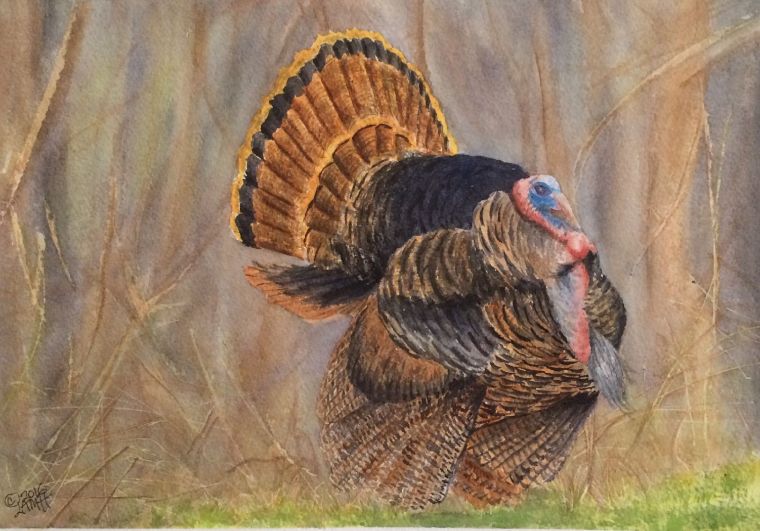
Mating Season (Glazed background).
With glazing, you have to think ahead and in layers of color. As you draw your picture on watercolor paper, plan the white areas to be saved. Further, also determine where you DON”T want your first glaze to be painted. (Often the first glaze is yellow, which is relatively light and does not readily cover other pigments.) If you planned a cool section for your painting, you might not want to cover that area with your warm yellow glaze. (You needn’t apply glazes over your whole paper.) Once you have applied your yellow glaze, evaluate whether it is too light, too dark, or just right. Adjust color intensity NOW, before adding a second color, by lifting lightly with clear water to lighten or by darkening with a second yellow layer.
While waiting for the yellow glaze to dry, plan ahead and consider what areas you want to cover with the pink (red) glaze. Will you paint some of the white areas with pink as you work to a final lavender color? Will you leave a snowy area untouched by this pink glaze? Will you still preserve some white paper to ‘pop’ in the final image? Paint a layer of pink, saving all areas as planned.
While waiting for this layer to dry, plan for the next glaze. Decide which areas of the painting will be covered by the blue glaze. Glaze some of the white with a layer of blue — for example, in a snowy area or a shadowed space. Avoid painting the blue glaze in a sunlit spot, ending the blue glaze and then softening with clear water into a sunny field or sunlit side of a building.
Finish your painting when the blue glaze is dry (or drying) by adding mid-tones and darks. Strive to preserve a good deal of your glazed area, however, to maintain the luminous, clean color mixes created by glazing.
Paintings with problem areas can often be rescued by using glazes. You can adjust and improve a painting that may lack mood, unity, or focus. Painting a thin, pale wash can add mood to a foggy scene. A single layer of color over the whole painting (or some parts) can add unity by giving all the colors a similar flavor. Further, darkening a section of a painting with a glaze can urge the eye to focus on more important and lighter areas. In the painting below, all of the background was glazed with Ultramarine Blue to tone down and bring more unity to disparate colors as well as help the background fade away and frame the center of interest (i.e. the blossoms).
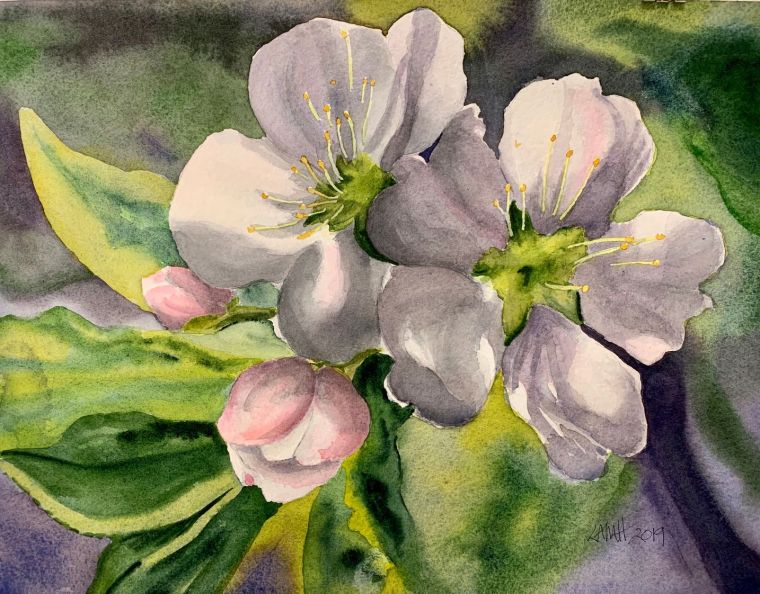
Apple Blossoms (Glazed background and shadowed buds/blossoms).
Glazing can also help you avoid muddy, opaque, or dull shadows. Bring a dull dark back to life with a glaze! To create a luminous shadow, first paint the subject (through BOTH the light and shadow side of the object) with the same local color. (In the above apple blossom picture, the buds and blossoms were painted with varying amounts of pink.) Then, when the first layer has dried, glaze a shadow color over the portion of the image in shadow. The first (local) color will show through the transparent shadow glaze (mixed in this case from yellow, red, and blue to create a transparent gray).
Transparent glazes applied separately change the colors under them. Color is built up optically on the paper by layering instead of mixing color on the palette prior to painting. Learn to overlap your glazes to produce satisfying colors. Develop your glazes from transparent watercolors, preferably non-staining. Begin with your lightest pigment, usually a yellow. Keep your washes diluted and pale. Remember to dry the previous layer before painting a new glaze. Always use the three primaries — don’t eliminate a layer! Instead, control the final appearance of color by strengthening one or two of the three primary colors. To create interesting, vibrant color, avoid making all three layers equal in intensity (which instead would produce a dull neutral).
I’ve got a newsletter now! Subscribe here. I’ll give a free copy of my blending tip pdf.

Thank you so much for the valuable information you share. I’ve been on hiatus from WP (and watercolor painting), but look forward to integrating your suggestions in future paintings 🙂
LikeLiked by 1 person
Thank you for your comment! I’m so glad the information was interesting and will be helpful.
By the way, your website is looking wonderful!!! So many nice features. Did you upgrade?
LikeLiked by 1 person
Not sure what you mean by upgrade. But I do pay for the ad free plan and have played around with templates to try to make a user friendly space. Thanks for the feedback!!
LikeLike
awesome light from window
LikeLike
Thank you! So glad you checked out the blog and commented.
Lee
LikeLike
Thank you for your generous sharing of your knowledge. All of a sudden areas of my paintings were looking muddy, I said to myself: “ How did I forget how to paint after 30 years?”. I think God said “ Your paint is too thick “, Obviously, He knows what He is talking about!!! Lol. Also, it is so hard to “ Stop”, as you put it when you get to the color you want . Humans don’t know when to Leave Well Enough Alone.
LikeLike
You’re very welcome!
It is definitely hard to stop and leave well enough alone! I think it’s a natural tendency to keep fussing, trying to make the painting just a little better.
LikeLike