I’ve got a newsletter now! Subscribe here. I’ll give a free copy of my blending tip pdf.
Most students of watercolor painting have heard the term wet-in-wet. It simply means painting color on a moistened (or prewet) paper. Wet-in-wet painting often involves painting with more than one color. The dampness on the paper allows pigments to relax and produce softly blended edges where the colors meet. The degree of wetness of the paper is important to the movement of the pigment.
There are numerous variations of wet-in-wet color blending in watercolor painting that you can use to create interesting textural and mixing effects. One of the most common ways to paint wet-in-wet involves dropping color onto wet paper and letting it flow and mingle freely on the wet surface, as when painting a sky. The aim is NOT to push color around on the paper after it is applied, but to allow the color to move and soften on its own, thus preserving spontaneity and freshness.
Further, you could drop water into damp paint to create light spots or streaks. The water drops push aside the paint to form the spots or streaks. Also, you might drop wet color into already applied (but still damp) color. If the paint you drop in is wetter than the first color, similar spots and streaks can be created. If, however, the pigment you add to wet paint is slightly thicker (less runny) than the first layer, the colors will blend slightly and soften smoothly.
Other variations on creating color changes on the watercolor paper are possible. For instance, several artists describe how they ‘mingle’ colors (or ‘put color next to color’). The area in which you do your mingling could be dry, wet, or partially wet; each creates a different effect. Use a spray bottle (with a coarse spray not a fine mist), spatter or dry brush with clean water to create a partially wet surface in preparation to adding paint. If you were to drop in color quickly, then you could add a second color (or more) right alongside (not on top of the first color), one color at a time. Do NOT mix the colors together after they are applied. Try to make sure that some of each of the original color remains visible. It’s okay for a few of your strokes to overlap slightly, as this is where blending occurs. You will have a wet multi-colored wash. Do not go back in to correct colors; leave the wash alone to allow the colors time to meld and soften on their own.

Wet-in-wet Background.
Most often, mingling or putting color next to color is done on dry paper. Transparent color is more successfully mingled, as opaque pigments can easily create mud. Mix separate, juicy puddles of all the colors you intend to mingle together. Load a brush with the first color and apply to dry paper. Clean your brush, remove excess water from the brush by blotting, and load your brush with the second color. Paint this next to and just touching the edge of the first color. You can add more colors in the same way (before any of the previous colors dry) to create even more interest. Variations in color temperature, from warm to cool, might be quite effective. Just remember to rinse and blot your brush with each color change to keep your colors bright and clean.
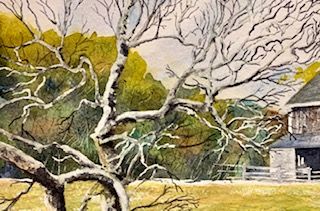
Mingled color in distant tree line.
I recently discovered yet another variation of wet-in-wet color blending on the paper that could be called ‘saving lights or whites with water’ (rather than using masking fluid). Using clean water only in some spots gives very soft edges, whether you are painting backgrounds or preserving highlights on an object. The first step in saving lights (or whites) with water is to carefully wet just the shapes you intend to keep light. When the paper has absorbed some of the wetness, add or mingle a number of colors on the dry paper, working the paint toward the dampened area. You will paint right up to the edge of the prewet areas. Do not add paint to the wet shapes, only to the dry paper. It is possible to further darken some areas if you wish (before the previous colors dry), but make sure to use thicker paint when adding to your damp colors. And remember to clean your brush between colors (to keep them bright) and remove any extra water on your brush by touching it to a paper towel or rag.

Saving whites with water in background, behind unfinished vases.
‘Charging’ is described in various ways by different artists. Whether charging is done on wet or dry paper, it describes the action of adding one color to another color on the watercolor paper (not the mixing of colors on the palette). Charging can be done by adding pigment to a wet passage and watching the colors blend on their own. For example, touch a wet shape with a brush loaded with paint (of the same value and thickness) of a different color. Or, paint your first color on dry paper and charge a second color next to the first. These colors soften into each other, because the paints are wet, yet the colors stay more or less where you put them.
Glazing is a slightly different way of varying color on the paper. Color is altered by adding a pale, transparent layer of of color over a dried wash. (Look for a later blog post which will describe the technique of glazing in more detail.)
It doesn’t matter what you call it – whether you paint wet-in-wet, charge, mingle, saving light with water, glaze, or put color next to color – these techniques of blending colors ON the watercolor paper (NOT on the palette) create lively and vibrant colors rather than flat, uninteresting areas which lack interest.

3 Comments